|
|
 Back Back |
 Side Side |
 Front
FrontStays Making Caveat… The tutorial on this site was written by me several years ago (c.2009) while I was regularly teaching stays-making classes. Undoubtedly there is additional research and information that has become available since that time but after reviewing these instructions I’m still happy with the techniques described here. Sources for materials may have changed and as time allows, I’ll work on updating and adding my original appendix files from past classes. Happy sewing!
Choosing Stays Materials
When reproducing clothing from an earlier period it is important to take special care in choosing the materials for each project. Stays present a particular challenge since they need to be made well to both provide the ideal eighteenth century silhouette and support the outer layers of clothing. As with any reproduction clothing, it is preferable to look at extant garments for the best examples of what materials to use. Fortunately for modern costumers, the majority of materials commonly used in the construction of eighteenth century stays are commonly available. This section will look at the various materials that can be used for stays-making, starting with the outermost layer.
OUTER (FASHIONABLE) FABRIC
- Fashionable fabrics were often used for the outer layer of the stays and choices included wool, silk, linen, and even cotton fabrics. With a total of four layers of fabric, plus boning, the choice of outer fabric is not likely to affect the weight or comfort level of the finished stays.
- Wool was a particular popular choice, likely due to its widespread availability and its durability. During the time of the American Revolution, the trend was for darker colored stays, often shades of green, blue & red. Green calamanco (hard finished wool) was a particularly popular choice. Prior to this time wool stays were also being made up of lighter colored wool damask among other choices. Wool satin is another excellent choice, although more difficult to find in modern shops.
- Silk was a more luxurious choice, but since less than a yard is needed, it would not have been out of the realm of possibility for a lady of middling class. Plain taffetas, satins and brocades were used. Occasionally, the boning channels are not sewn through the silk layer, providing a smooth outer cover to the stays.
- Linen can be used for both the inner canvas layers as well as the outer fashion layer, or the canvas inner layers can serve as the outer layer itself. Plain weave linen works very nicely for an outer cover and while many linen stays used natural linen or similar shades of brown and tan, other solid colors of linen can be used. It should be kept in mind that linen is more difficult to dye in the 18th century so you’ll want to choose colors that are either more subdued or have a history of being used for linen dyeing. Indigo blue, madder brown & walnut brown are all excellent choices
- Surprisingly, cotton was also used for stays covering. Cotton satins, sateens and twills were used with regularity, and once again darker colors seem to prevail. The Waverly company produces a line of cotton sateen called ‘Glosheen’ which is available in almost 30 colors, if you can track them down!
CANVAS INTERLINING
The second and third layers of the stays are most commonly made up of tabby weave natural (unbleached/undyed) linen canvas. The weight is generally between 10-15 oz with a thread count of 30-35 threads per inch in warp and weft. When choosing the canvas, you want it to have stiff hand and smooth surface but it should still be pliable enough to hand sew easily. Even though the channels may be machine sewn the remaining construction steps require a great deal of fabric manipulation.
THREAD
Of course all extant stays were sewn by hand and the sewn channels and eyelets were most often worked with linen thread. Half-bleached or unbleached linen thread is size 40/2 most closely approximates the stitching seen on originals. It was quite common to see the lighter thread color against the darker fabric of the outer stays layer. The result is an almost decorative effect from the machine-like straight stitching. Unfortunately this thread can’t be used in sewing machines, so if you are opting for machine sewn channels another choice must be made. The two most suitable threads I have found are Coats & Clark Dual Duty Plus Topstitching thread (cotton-covered polyester core) and Gutermann Top Stitch thread (polyester). Both threads are available in a ‘natural’ shade that closely approximates half-bleached linen and can be found in most local fabric stores. The Coats & Clark thread is more lightweight and easier to use with a machine but the Gutermann thread provides a better finished look, being closer in weight to 40/2 linen. It may take some experimentation to find the thread that best achieves your desired channel effect. For less obvious stitching, 100% cotton machine thread can be used to good effect.
The channels are the only section of the stays which can be successfully sewn by machine. It is highly recommended that linen thread be used for all other sewing. It is also possible to sew the channels using a thread color that matches the outer layer of the stays, this is a particularly good option if you are less confident about being able to complete straight even stitching by machine or by hand.
BONING
- Boning choices fall into four separate categories: baleen (whalebone), wood, plastic, or metal. Baleen is by far the most authentic and can be ordered by individual consumers through the Alaska Fur Exchange. However, since the baleen comes as a whole fin or as two halves, I can offer no advice on how the baleen is split to be used for stays but this could be an adventure for the authentically minded!
- Wood is my boning of choice and I prefer to use hand-pounded ash staves for their thickness and smoothness. They are generally 50/1000” thick and have a beautiful feel to them. Since the wood is hand-pounded, the growth separate in the process, providing strips that are inherently strong and run perfectly on grain. The flexibility they offer can’t be matched. Splint or stave boning was used in period, making this an excellent alternative to baleen. Oak splint may also be used, but I’ve had less luck finding a smooth finished source. Half-round reed is another option but has more of a tendency to crack than pounded splint. Wood boning has the added bonus of being able to sew through it.
- Plastic, while obviously a modern choice, does offer some benefits that make it a worthwhile option. Plastic behaves much like baleen, in that is will flex with the figure, can be molded with heat and is nearly impossible to break. There are three different options when it comes to plastic: common dressmaker’s boning, rigilene, and cable ties. Common dressmaker’s boning is the bulkiest but it is lightweight enough to sew through. It also holds its shape when steamed and can be easily re-molded after wearing. Rigilene is designed to be sewn through and is the lightest of the plastic bonings. It is better saved for stays that don’t need to provide much bust support. Cable ties are an attractive and inexpensive option as they are available in narrow widths which mimic the excessively narrow boning channels in late 18 century stays.
- Metal boning is the final option. Available in ¼” and ½” widths, finished steel boning is an acceptable option. It can be purchased in finished lengths, eliminating the need for edge finishing. However, once bent, it is difficult to remold to a different shape. Spiral steel boning, is just that, a length of spiral-bound steel, pressed flat and finished with end caps, purchased separately. While spiral steel boning offers more flexibility and will more easily return to its original shape, it is a great deal heavier. Steel strapping is also useable and is a more economical option, since it comes in an uncut roll. The down side is that it’s more dangerous to work with and the cut ends need to be treated with a dipping solution to provide a buffer to the sharp cut edges.
BINDING & WELTING
Historically, these steps can be ignored altogether and a simple casting stitch can be used over the cut edges of the stays to keep the boning in place. On the other hand, since a more aesthetic look is usually desired, welting strips can be added along the seams and binding can be added along the top and bottom edges of the stays. Originally, stays that had welting strips primarily used a narrow ¼” woven silk tape. Without a modern substitute, a leather strip cut the same width can be used. The choices for binding are more numerous and include silk tape, silk ribbon, strips of wool, and the most common choice, strips of leather. Leather provides the added advantage of protecting the body from any pieces of boning that would otherwise be digging into the flesh. Sheepskin and goatskin were most commonly used, and modern chamois is likely very similar to a binding referred to as ‘wash leather’ in the period. Pigskin is another acceptable choice.
LINING
The final element of stays construction is the lining. This is the one section of the stays that may end up undergoing laundering treatments and/or replacement before the stays are completely worn out. ‘Lining checks’ and ‘striped linings’ are listed among period merchants’ offering and likely refer to a medium-quality blue and white checked, plaid, or striped linen commonly used for linings in the eighteenth century. This layer is closest to the body and meant to absorb any body soiling or odors as well as to provide a neat cover over the interior construction. Any linen will do but care should be taken to ensure that the dyes are colorfast…. Otherwise a pink or blue shift may the result after wearing the stays on a hot, humid day!
Measuring for Stays
Photos and directions to be added.
Laying Out a Pattern
 A single layer of the fashion fabric (the green linen in this example) is placed on top of two layers of the unbleached linen. Several pins may be helpful in holding all three layers together. Place each pattern piece on the fabric layers, keeping each piece on grain. Generally speaking , the longer side of the piece should be parallel to the grain of the fabric.Leave at least one inch of space all the way around each pattern piece (that means two inches between two pieces). For pieces that will have eyelets (back pieces and front pieces for stays with a stomacher), leave two inches along the eyeleted edge. A single layer of the fashion fabric (the green linen in this example) is placed on top of two layers of the unbleached linen. Several pins may be helpful in holding all three layers together. Place each pattern piece on the fabric layers, keeping each piece on grain. Generally speaking , the longer side of the piece should be parallel to the grain of the fabric.Leave at least one inch of space all the way around each pattern piece (that means two inches between two pieces). For pieces that will have eyelets (back pieces and front pieces for stays with a stomacher), leave two inches along the eyeleted edge. |
 Trace around each paper pattern piece with a chalk marker or pencil. Flip each pattern piece over and repeat this process to get a left and right for each pattern piece of the stays. (Please note: this photo is upside down – sorry!) Trace around each paper pattern piece with a chalk marker or pencil. Flip each pattern piece over and repeat this process to get a left and right for each pattern piece of the stays. (Please note: this photo is upside down – sorry!) |
 Once all pieces (left & right) have been outlined with chalk, baste along the inside of the chalk line with 40/2 linen thread. White or unbleached thread is acceptable – whatever shows up against your fashion fabric. Larger stitches are fine, as long as they go through all three layers. It is best to keep the fabrics flat on the table while working as this prevents distortion of the your pattern. Once all pieces (left & right) have been outlined with chalk, baste along the inside of the chalk line with 40/2 linen thread. White or unbleached thread is acceptable – whatever shows up against your fashion fabric. Larger stitches are fine, as long as they go through all three layers. It is best to keep the fabrics flat on the table while working as this prevents distortion of the your pattern. |
 After all pieces have been basted, cut them apart. Leave as much extra fabric as possible around each piece. You’re now ready to begin construction on the stays. After all pieces have been basted, cut them apart. Leave as much extra fabric as possible around each piece. You’re now ready to begin construction on the stays. |
Instructions to Construct Stays
 Construction begins with the back pieces. Flip pieces over to the unbleached linen side. Separate the top layer of unbleached linen along the edge that will have eyelets. Cut away the extra linen of the topmost layer of unbleached linen as close to the basting stitching as possible. Make sure you cut only one layer! This will reduce the bulk when folding along your basting line.Once the single layer of unbleached linen has been trimmed, fold the back pieces to the inside along the basted center back line. (This is the same edge that was trimmed and will have the eyelets) Construction begins with the back pieces. Flip pieces over to the unbleached linen side. Separate the top layer of unbleached linen along the edge that will have eyelets. Cut away the extra linen of the topmost layer of unbleached linen as close to the basting stitching as possible. Make sure you cut only one layer! This will reduce the bulk when folding along your basting line.Once the single layer of unbleached linen has been trimmed, fold the back pieces to the inside along the basted center back line. (This is the same edge that was trimmed and will have the eyelets) |
 Using a straight edge (I prefer a clear quilting ruler), draw a chalk line approximately 3/8″ away from the folded edge. This will mark the line which will create a boning channel along the back lacing edge. Using a straight edge (I prefer a clear quilting ruler), draw a chalk line approximately 3/8″ away from the folded edge. This will mark the line which will create a boning channel along the back lacing edge. |
 Using a spaced backstitch and a single strand of 40/2 bleached linen thread, stitch through all layers along the line that you chalked. The bulk of the fabric will keep your stitches spaced apart. Try to keep them 1/4″ apart at most. You will see very small prick stitches on the right side of the piece and it will look like a running stitch on the inside. Using a spaced backstitch and a single strand of 40/2 bleached linen thread, stitch through all layers along the line that you chalked. The bulk of the fabric will keep your stitches spaced apart. Try to keep them 1/4″ apart at most. You will see very small prick stitches on the right side of the piece and it will look like a running stitch on the inside. |
 Here the two back pieces have been folded, chalk line marked 3/8″ away from fold, and spaced backstitch stitched along the chalk line. Marking the position of the eyelets is next. Here the two back pieces have been folded, chalk line marked 3/8″ away from fold, and spaced backstitch stitched along the chalk line. Marking the position of the eyelets is next. |
 In this photo the right back piece is on top and the left back piece is on the bottom. The topmost and bottommost eyelets must match, the remaining eyelets are offset. Beginning with the right hand side, make a chalk mark 3/4″ from the bottom. Measure up 3/4″ and make another mark. Continue making a mark every 1 1/2″ inches until you are no less than 1″ away from the top.On the left side, mark the first eyelet position, 3/4″ from the bottom. Mark the remaining positions 1 1/2″ apart until you are no less than 1″ away from top. You will need to add an additional eyelet at the top on one side, to match the top eyelet on the other side. This eyelet will be 3/4″ above the previous eyelet. Which side this falls on will depend on the overall length of piece. In this photo the right back piece is on top and the left back piece is on the bottom. The topmost and bottommost eyelets must match, the remaining eyelets are offset. Beginning with the right hand side, make a chalk mark 3/4″ from the bottom. Measure up 3/4″ and make another mark. Continue making a mark every 1 1/2″ inches until you are no less than 1″ away from the top.On the left side, mark the first eyelet position, 3/4″ from the bottom. Mark the remaining positions 1 1/2″ apart until you are no less than 1″ away from top. You will need to add an additional eyelet at the top on one side, to match the top eyelet on the other side. This eyelet will be 3/4″ above the previous eyelet. Which side this falls on will depend on the overall length of piece. |
 You will be stitching your eyelets next to the spaced backstitch. Using an awl, separate the threads to form a hole for the eyelet. I prefer to use a common awl (found at the hardware store) with a 1/4″ shaft at the base of the handle. When shopping for an awl, try to find one that fits comfortable into your palm, as most of the pressure will be felt there. You will be stitching your eyelets next to the spaced backstitch. Using an awl, separate the threads to form a hole for the eyelet. I prefer to use a common awl (found at the hardware store) with a 1/4″ shaft at the base of the handle. When shopping for an awl, try to find one that fits comfortable into your palm, as most of the pressure will be felt there. |
 It is important to use an awl rather than cutting a hole with scissors or a leather punch. An awl separates the threads of the woven fabric but does not break them – as a result the eyelet is much stronger. It is important to use an awl rather than cutting a hole with scissors or a leather punch. An awl separates the threads of the woven fabric but does not break them – as a result the eyelet is much stronger. |
 Eyelets are stitched with the thread (bleached linen 40/2) doubled in the needle. To begin the eyelet, run the needle through the layers and come up 1/8″ away from the edge of the eyelet hole. Let the tail end of the thread disappear between the layers. Send the needle down into hole and come up through the layers next to your first stitch, again 1/8″ away from the edge. If possible, sew through your first stitch as this will help to anchor your stitching without the use of knots. Eyelets are stitched with the thread (bleached linen 40/2) doubled in the needle. To begin the eyelet, run the needle through the layers and come up 1/8″ away from the edge of the eyelet hole. Let the tail end of the thread disappear between the layers. Send the needle down into hole and come up through the layers next to your first stitch, again 1/8″ away from the edge. If possible, sew through your first stitch as this will help to anchor your stitching without the use of knots. |
 Repeat this step all the way around the hole. You may need to insert the awl after every two or three stitches to keep the hole opened up. Inserting the awl after every stitch will help create a more professionally finished eyelet. Try to stitch approximately 16 stitches around the hole,Please note: This is not a buttonhole or blanket stitch. It is a simply overcast stitch to bind the opening of the threads that have been spread apart by the awl. Repeat this step all the way around the hole. You may need to insert the awl after every two or three stitches to keep the hole opened up. Inserting the awl after every stitch will help create a more professionally finished eyelet. Try to stitch approximately 16 stitches around the hole,Please note: This is not a buttonhole or blanket stitch. It is a simply overcast stitch to bind the opening of the threads that have been spread apart by the awl. |
 Super close up view of right side of eyelet! The linen seen in the center of the eyelet was placed underneath to prevent the flash from glaring against the table. When your eyelet is finished, you will have bound hole through all layers. Super close up view of right side of eyelet! The linen seen in the center of the eyelet was placed underneath to prevent the flash from glaring against the table. When your eyelet is finished, you will have bound hole through all layers. |
 When ending each eyelet, bring your thread to the wrong side and slide the needle & thread through several of the eyelet stitches. If you have enough thread left, continue onto the next eyelet without cutting your thread. This will chain the eyelets together and the resulting eyelets will be stronger. The connecting threads should be on the side of the eyelets farthest from the folded edge. (As seen in the photo) This will allow the connecting threads to be covered by the lining in the final construction steps.Generally your thread will allow two or three eyelets to be connected. Don’t start a new eyelet unless you are sure you have enough thread to finish it. When ending each eyelet, bring your thread to the wrong side and slide the needle & thread through several of the eyelet stitches. If you have enough thread left, continue onto the next eyelet without cutting your thread. This will chain the eyelets together and the resulting eyelets will be stronger. The connecting threads should be on the side of the eyelets farthest from the folded edge. (As seen in the photo) This will allow the connecting threads to be covered by the lining in the final construction steps.Generally your thread will allow two or three eyelets to be connected. Don’t start a new eyelet unless you are sure you have enough thread to finish it. |
 Here all the eyelets have been completed on the back pieces. You can see that the eyelets are offset. If you are making stays with a stomacher front, you will repeat this entire process along the lacing edge of the two front pieces.Once all the eyelets are in place, it’s time to add channels. Here all the eyelets have been completed on the back pieces. You can see that the eyelets are offset. If you are making stays with a stomacher front, you will repeat this entire process along the lacing edge of the two front pieces.Once all the eyelets are in place, it’s time to add channels. |
 You’ll need a straight edge and a chalk marker or pen. I like to use the chalk wheels made for quilting. The provide a thin, precise line, are refillable and come in several colors. For a straight edge you can use a ruler or a piece of plastic or metal boning.Using your original pattern as a guide, chalk the channel lines in the same directions on your individual stay pieces. For a fully boned pair of stays, boned with ash splint, channels should be just a tiny bit wider than 1/4.” If using an alternate boning, use boning as your guide to determine channel width. Boning should fit snugly inside channels. You’ll need a straight edge and a chalk marker or pen. I like to use the chalk wheels made for quilting. The provide a thin, precise line, are refillable and come in several colors. For a straight edge you can use a ruler or a piece of plastic or metal boning.Using your original pattern as a guide, chalk the channel lines in the same directions on your individual stay pieces. For a fully boned pair of stays, boned with ash splint, channels should be just a tiny bit wider than 1/4.” If using an alternate boning, use boning as your guide to determine channel width. Boning should fit snugly inside channels. |
 If sewing channels by machine, I recommend Coats & Clark Topstitching thread in the color ‘natural’. This mimics the heavier linen hand-sewing thread but still works well in a sewing machine. Regular thread can be used in the bobbin. Sew along the marked lines, backstitching two or three stitches at the top and bottom of each line. Make sure to start and stop your stitched inside your original basting line.When reaching the end of a line, lift the needle & presser foot, pivot the pattern piece and sew down the next line. You do not need to sew all lines in the same direction or cut threads between each line. If sewing channels by machine, I recommend Coats & Clark Topstitching thread in the color ‘natural’. This mimics the heavier linen hand-sewing thread but still works well in a sewing machine. Regular thread can be used in the bobbin. Sew along the marked lines, backstitching two or three stitches at the top and bottom of each line. Make sure to start and stop your stitched inside your original basting line.When reaching the end of a line, lift the needle & presser foot, pivot the pattern piece and sew down the next line. You do not need to sew all lines in the same direction or cut threads between each line. |
 Some pieces may require you to stitch channels that intersect. On those pieces, sew the straighter, longer channels first. When sewing the intersecting channels (which are often curved or on an angle), leave a long thread tail in the machine needle and start stitching exactly at the intersection point – do not backstitch. When you reach the end of the channel at the basting line, you can backstitch two or three stitches as usual. When sewing towards the intersection, stop exactly at a join and leave an extra long thread tail. Be sure to move threads out of the way when sewing nearby channels. Some pieces may require you to stitch channels that intersect. On those pieces, sew the straighter, longer channels first. When sewing the intersecting channels (which are often curved or on an angle), leave a long thread tail in the machine needle and start stitching exactly at the intersection point – do not backstitch. When you reach the end of the channel at the basting line, you can backstitch two or three stitches as usual. When sewing towards the intersection, stop exactly at a join and leave an extra long thread tail. Be sure to move threads out of the way when sewing nearby channels. |
 If your thread is in loops (as in the picture above), cut them apart at the halfway point. Do this on the right side and wrong side of the stay piece.Working on the wrong side of the pieces, gently pull on the thread tail, one at a time. This should create a small loop of thread to appear as you pull the thread from the right side through the layers. Once the loop appears, use a pin or needle to open the loop and pull the thread completely to the wrong side of the stays. Tie the two thread tails together with a square knot. Cut off excess thread, leaving only 1/2″ beyond the knot. If your thread is in loops (as in the picture above), cut them apart at the halfway point. Do this on the right side and wrong side of the stay piece.Working on the wrong side of the pieces, gently pull on the thread tail, one at a time. This should create a small loop of thread to appear as you pull the thread from the right side through the layers. Once the loop appears, use a pin or needle to open the loop and pull the thread completely to the wrong side of the stays. Tie the two thread tails together with a square knot. Cut off excess thread, leaving only 1/2″ beyond the knot. |
 This photo is of the wrong side and is showing the threads pulled to the wrong side and knotted together. This photo is of the wrong side and is showing the threads pulled to the wrong side and knotted together. |
 The picture at left show the neat appearance on the right side when using this method to secure your threads. As you can see, it’s well worth the trouble!Once the channels have been completed on all pieces, you are ready to move on the next stage. The picture at left show the neat appearance on the right side when using this method to secure your threads. As you can see, it’s well worth the trouble!Once the channels have been completed on all pieces, you are ready to move on the next stage. |
 Each piece will be folded to the inside along the two vertical basting lines (the side edges only – not the top & bottom). Press well with a steam iron until the stay piece will hold the fold on its own. Repeat for all pieces, including stomacher, if you have one. Each piece will be folded to the inside along the two vertical basting lines (the side edges only – not the top & bottom). Press well with a steam iron until the stay piece will hold the fold on its own. Repeat for all pieces, including stomacher, if you have one. |
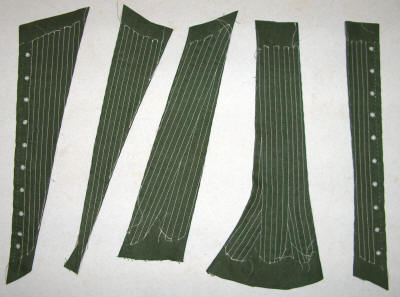 One half of the stays pieces have been completed and are shown in the order they will be sewn together. The curved edges will be more difficult to fold to the inside – you may need to trim the seam allowance down to 3/4″ and the pieces are unlikely to lay flat once the fold is pressed into place. One half of the stays pieces have been completed and are shown in the order they will be sewn together. The curved edges will be more difficult to fold to the inside – you may need to trim the seam allowance down to 3/4″ and the pieces are unlikely to lay flat once the fold is pressed into place. |
 The next step is to begin joining the pieces. Pin two adjoining pieces with rights sides together. Match the basting lines and follow curves if necessary. Using a double strand of 40/2 linen thread, overcast the two folded edges together, working through all layers. You want this seam to create the final channel on each piece. Be sure to stop before you get to the bottom to allow the fingers to remain spread apart. Refer to your pattern for the stopping points. The next step is to begin joining the pieces. Pin two adjoining pieces with rights sides together. Match the basting lines and follow curves if necessary. Using a double strand of 40/2 linen thread, overcast the two folded edges together, working through all layers. You want this seam to create the final channel on each piece. Be sure to stop before you get to the bottom to allow the fingers to remain spread apart. Refer to your pattern for the stopping points. |
 As each piece is joined to the next, press the seam as flat as possible. Here is one half of the pair of stays, with all pieces joined together. As each piece is joined to the next, press the seam as flat as possible. Here is one half of the pair of stays, with all pieces joined together. |
 Welting is optional. It serves a decorative purpose and hides the seams.Begin by pinning the welting strip to the inside of the stays at the top of a seam. You will pull it over the top to the outside. The pin will secure it until you have completed enough stitches to hold it in place. Welting is optional. It serves a decorative purpose and hides the seams.Begin by pinning the welting strip to the inside of the stays at the top of a seam. You will pull it over the top to the outside. The pin will secure it until you have completed enough stitches to hold it in place. |
 The welting is applied with a herringbone stitch, although most of the threads will be carried below the welting and hidden. The basic pattern is a backstitch along one edge of the welting, slide the needle diagonally beneath the welting to come up along the opposite edge. The key is to pick up several threads of the stays with each below-welting pass.This can be done after the boning has been added which gives a nicer finished appearance. However, the stays are much easier to manipulate and add welting to before the boning is added. The welting is applied with a herringbone stitch, although most of the threads will be carried below the welting and hidden. The basic pattern is a backstitch along one edge of the welting, slide the needle diagonally beneath the welting to come up along the opposite edge. The key is to pick up several threads of the stays with each below-welting pass.This can be done after the boning has been added which gives a nicer finished appearance. However, the stays are much easier to manipulate and add welting to before the boning is added. |
 The boning can be inserted at this point. It will be placed between the two layers of unbleached linen. It should extend beyond the basting lines at top and bottom. Boning pieces should be cut and shaped to fit into the intersecting channels. Once all channels are boned, you’ll need to finish the seams on the inside.Trim the seam allowance down to between 1/2″ and 3/4″ along each piece. Using a single strand of thread, whipstitch the three layers of seam allowance to the inner layer on unbleached linen. You can use a blanket stitch here if you prefer. These don’t need to be small stitches – just enough to keep the seam allowances flat against the stays body. The boning can be inserted at this point. It will be placed between the two layers of unbleached linen. It should extend beyond the basting lines at top and bottom. Boning pieces should be cut and shaped to fit into the intersecting channels. Once all channels are boned, you’ll need to finish the seams on the inside.Trim the seam allowance down to between 1/2″ and 3/4″ along each piece. Using a single strand of thread, whipstitch the three layers of seam allowance to the inner layer on unbleached linen. You can use a blanket stitch here if you prefer. These don’t need to be small stitches – just enough to keep the seam allowances flat against the stays body. |
 Once the welting is finished and the inside seams have been cast down, you’re ready to begin cutting away the excess material & boning from the top and bottom edges. (Front of stays is shown at left, minus stomacher at center front) Once the welting is finished and the inside seams have been cast down, you’re ready to begin cutting away the excess material & boning from the top and bottom edges. (Front of stays is shown at left, minus stomacher at center front) |
 I recommend working on the top edges of the stays to begin with. Using scissors or a 1″ chisel, cut through all layers, including boning, just outside the basting stitches. Cut slowly and carefully around the curves and try to avoid cutting any of channel stitches. Cut away excess materials along the entire top edge. I recommend working on the top edges of the stays to begin with. Using scissors or a 1″ chisel, cut through all layers, including boning, just outside the basting stitches. Cut slowly and carefully around the curves and try to avoid cutting any of channel stitches. Cut away excess materials along the entire top edge. |
Applying Binding
 Stays are bound with strips of 3/4″ leather. Place the right side of the leather against the right side of the stay, with the leather overhanging the cut edge by 1/8″. Sew the leather to the top two layers of stays fabric using a backstitch (10spi) but do not try to sew through the wood. The seam line should be 1/4″ away from the edge of the leather and 1/8″ away from the edge of the stays. It may be helpful to draw the seam line onto the leather using a pencil. Stays are bound with strips of 3/4″ leather. Place the right side of the leather against the right side of the stay, with the leather overhanging the cut edge by 1/8″. Sew the leather to the top two layers of stays fabric using a backstitch (10spi) but do not try to sew through the wood. The seam line should be 1/4″ away from the edge of the leather and 1/8″ away from the edge of the stays. It may be helpful to draw the seam line onto the leather using a pencil. |
 The leather binding should extend around the corner to the center back along the lacing holes. It only needs to extend about 1″ and is sewn in the same manner as the rest of the binding. The end of the leather is finished with a cut edge, it does not need to be turned under. The leather binding should extend around the corner to the center back along the lacing holes. It only needs to extend about 1″ and is sewn in the same manner as the rest of the binding. The end of the leather is finished with a cut edge, it does not need to be turned under. |
 Once the binding has been sewn to the face of the stays, it is ready to be stretched over the edge and whipped down to the stays interior. Once the binding has been sewn to the face of the stays, it is ready to be stretched over the edge and whipped down to the stays interior. |
 An underhand hem stitch or a whip stitch will work to hold the leather binding in place on the inside of the stays. Try to keep the stitches fairly close, approximately 6-8spi. Be particularly careful when stitching the corners since they will not be covered by the lining. An underhand hem stitch or a whip stitch will work to hold the leather binding in place on the inside of the stays. Try to keep the stitches fairly close, approximately 6-8spi. Be particularly careful when stitching the corners since they will not be covered by the lining. |
 The flash makes this difficult to see… but once the binding starts to go on, this never-ending project really begins to look like stays! The flash makes this difficult to see… but once the binding starts to go on, this never-ending project really begins to look like stays! |
| Once the top edge has been completely bound, it’s time to tackle the bottom edges. Just remember to go slowly and take breaks often!Sorry… no pictures for binding the bottom of the stays but you’ll see the results in the next few pictures while I’m applying the lining. |
Lining the Stays
 Checked linings make the process a bit more interesting… and not quite as tedious as plain white! The first step is to apply on the straight edge of the lining against the eyelets on the wrong side of the stays. In this case, I was able to use to the selvage. If the selvage doesn’t have a nice edge, simply turn it under and place the resulting folded edge against the eyelets. The lining should cover any threads that trail between your eyelets. Checked linings make the process a bit more interesting… and not quite as tedious as plain white! The first step is to apply on the straight edge of the lining against the eyelets on the wrong side of the stays. In this case, I was able to use to the selvage. If the selvage doesn’t have a nice edge, simply turn it under and place the resulting folded edge against the eyelets. The lining should cover any threads that trail between your eyelets. |
 Make sure that there is enough lining fabric to cover the entire piece you are working on Here the lining has been pinned to the interior of the stays along the eyelets at the center front. The stays are shown right side up to help show the excess lining fabric that is needed. Make sure that there is enough lining fabric to cover the entire piece you are working on Here the lining has been pinned to the interior of the stays along the eyelets at the center front. The stays are shown right side up to help show the excess lining fabric that is needed. |
 This is the top edge of the stays with the lining trimmed to 1/2″ away from the binding. This is the top edge of the stays with the lining trimmed to 1/2″ away from the binding. |
 Small clips are made into the curved areas to allow the lining to fold smoothly along the curving armsyce. Small clips are made into the curved areas to allow the lining to fold smoothly along the curving armsyce. |
 The lining is turned under along the top edge and held in place with straight pins. The next step is to sew along the front and top edges, securing the lining in place. When attaching the lining to a bound edge, you will be sewing the lining to the leather. The lining is turned under along the top edge and held in place with straight pins. The next step is to sew along the front and top edges, securing the lining in place. When attaching the lining to a bound edge, you will be sewing the lining to the leather. |
 An underhand hem stitch is the neatest way to attach the lining but a whipstitch will also work. Again, try to keep stitches between 6-8 spi. An underhand hem stitch is the neatest way to attach the lining but a whipstitch will also work. Again, try to keep stitches between 6-8 spi. |
 As usual, dealing with the fingers at the bottom is the tricky part! Working with one tab at a time, trim away the lining 1/4″ away from the binding, turn edges under, sew in place and then move on to the next finger. As usual, dealing with the fingers at the bottom is the tricky part! Working with one tab at a time, trim away the lining 1/4″ away from the binding, turn edges under, sew in place and then move on to the next finger. |
 Here is the same finger, as seen from the back, with the edges turned under waiting to be sewn. Sewing the lining to each finger should be completed before moving on to the next finger. This ensures that there is enough lining material to cover each finger as you progress. Here is the same finger, as seen from the back, with the edges turned under waiting to be sewn. Sewing the lining to each finger should be completed before moving on to the next finger. This ensures that there is enough lining material to cover each finger as you progress. |
 Once the first finger has been lined, move to adjacent finger. Repeat the steps above: trim lining 1/4″ larger than finger, turn edges under, hold in place with pins, and stitch to the stays. Repeat this process for all fingers. After the bottom edge is completely lined, place stays right side up on your workspace. Trim excess lining away along remaining edge of stays. The lining should be trimmed slightly away from the edge to prevent cutting into the stays. Turn this edge under so that fold is at the edge of the eyelets, covering any thread trails between eyelets. Pin in place and stitch lining to stays. Construction is over… congratulations! Once the first finger has been lined, move to adjacent finger. Repeat the steps above: trim lining 1/4″ larger than finger, turn edges under, hold in place with pins, and stitch to the stays. Repeat this process for all fingers. After the bottom edge is completely lined, place stays right side up on your workspace. Trim excess lining away along remaining edge of stays. The lining should be trimmed slightly away from the edge to prevent cutting into the stays. Turn this edge under so that fold is at the edge of the eyelets, covering any thread trails between eyelets. Pin in place and stitch lining to stays. Construction is over… congratulations! |
Finishing Touches & Shaping
 Make sure to remove any basting threads that are visible. There are likely to be thread remaining along the folded edge parallel to eyelets. Be careful not to cut into the stays! Make sure to remove any basting threads that are visible. There are likely to be thread remaining along the folded edge parallel to eyelets. Be careful not to cut into the stays! |
 If making stays with a stomacher front, lace the back together before proceeding with steaming. If making stays with a stomacher front, lace the back together before proceeding with steaming. |
 Keeping the top of the stays upright, allow the fingers to splay open against the ironing board. Apply a hot iron with steam setting against the stays just above the top of the finger where the stays will be bending over the hip. Keeping the top of the stays upright, allow the fingers to splay open against the ironing board. Apply a hot iron with steam setting against the stays just above the top of the finger where the stays will be bending over the hip. |
 While stays are still damp and warm, place them flat on the ironing surface. Using your hands, continue to splay the fingers open so that they are spread out and fully extended. A gentle curve should form just above the top of the fingers at the hip area. While stays are still damp and warm, place them flat on the ironing surface. Using your hands, continue to splay the fingers open so that they are spread out and fully extended. A gentle curve should form just above the top of the fingers at the hip area. |
 Re-steam and repeat the molding process until you are happy with the results. Allow the stays to cool in this position and they are holding the shape on their own. Re-steam and repeat the molding process until you are happy with the results. Allow the stays to cool in this position and they are holding the shape on their own. |
 Using the same steaming & molding process, treat the top of the center back of the stays. This section should curve gently towards the body. This will eliminate (or at least reduce!) the often-seen stays ridge that appears underneath clothing at the upper back By taking the time to do these steps, the stays will be become more comfortable to wear and provide an improved 18th century figure. Using the same steaming & molding process, treat the top of the center back of the stays. This section should curve gently towards the body. This will eliminate (or at least reduce!) the often-seen stays ridge that appears underneath clothing at the upper back By taking the time to do these steps, the stays will be become more comfortable to wear and provide an improved 18th century figure. |
More Resources
Making Stays, 1730-1780 Pinterest Board
7 Comments
Excellent tutorial! I’m really excited to start on my stays now! Just one question – If the pattern calls for shoulder straps, do you add them just before the binding step?
Thanks Chelsea! And yes, you generally want to attach the straps just before adding the binding. If there are any boning channels that are open where the straps are attached, you’ll want to close them up first, either with a short piece of binding or just whipstitching the channels closed. I’ll see if I have any other photos showing that detail. Thanks for asking!
Thank you very much for posting this detailed page. I couldn’t find directions for the leather binding anywhere else. Also, the steaming technique to shape the boning is genius, although it won’t work on the metal bones (I’m using some metal and some reed.)
Thank you so much for this tutorial. I have been trying to find one that provides the different stitches needed for hand sewing and the pictures provided are perfect.
Thank you! I’ve been horrible about adding new info to this blog but I’m so glad you’ve found what is there useful. Feel free to ask questions if anything is still unclear.
Hello,
I just wanted to say that this tutorial is in impeccable detail, it’s helping me more than any other information I’ve found online in my first pair of stays project. I was wondering where you get your ash staves for the boning? Are they the same as the ash splints used in basket weaving?
Thank you!
I’m so glad you’re finding it helpful! The short answer is that my supplier of ash staves stopped offering them several years ago and I never found someone to replace him. However, what you’re looking for are the staves or uprights that are used for traditional basket making. Hand-pounded ash was my favorite to work with – the hand-pounding separates the wood at its tree ring growth thickness which is what allows for incredible flexibility and strength. Ash splints are too thin and easily cracked to handle the abuse of being in the stays. That said – I’m also a huge fan of using cable/zip ties that you can find at the hardware store. I’ve been using those for my more recent 18th stays and am also happy with how they last and respond to heavy use. If I can answer anything else, please don’t hesitate to ask!